| Missouri Cemeteries formerly: Central Missouri Cemeteries Locate/Protect/Preserve our Pioneer Cemeteries |
| Links | Home
| Contact
Us |
+ Larger Font | - Smaller Font |
|
|
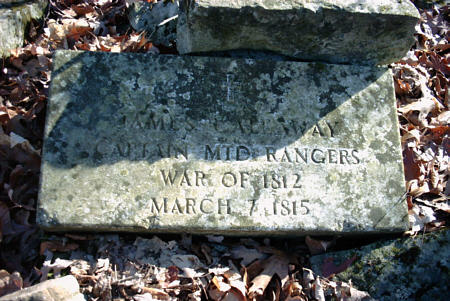
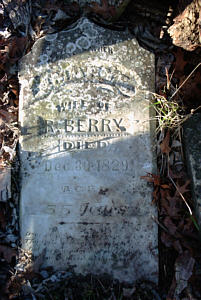
Whether we like it or not, some cemeteries lend themselves very readily to photographic techniques, others we can readily photograph most stones for transcription purposes, while other cemeteries are so old and in such poor condition that we can only photograph the stones without regard for attempting to transcribe vital information from them. When going into these older cemeteries, one must be prepared to accept the fact that photographing for transcription is essentially impossible and that the photo is simply a record of the number, shapes, and locations of stones and will never reveal any vital information. For the most part, most of the tricks associated with photographing cemeteries annd particularly tombstones doesn't change much whether you choose to use the conventional film cameras that most of us are familiar with or the newer digital cameras that are available on the market. Since most of us are less familiar with digital imaging we will try to cover the ins and outs of taking a digital camera into the cemeteries. Many of the tricks that can be used to enhance contrast and legibility of the images will apply to both types of cameras and will be covered toward the end of this page.
* - Assumes that storage will be on card type media instead of floppy disks. Plan your useage of floppy disks accordingly.
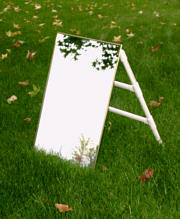
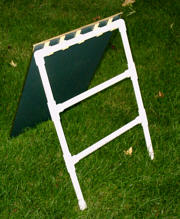
Lighting is probably the most critical obstacle that you will face in obtaining good, high definition, images of tombstones. According to tradition, most older cemeteries will bury individuals facing East, which will generally mean that the inscriptions on the headstones will also be facing East. Morning light then becomes the best light in which to obtain the best lighting for photographing tombstones; however the number of exceptions to this are great. Trees overhead, cloudy and overcast days, and poorly oriented stones make the task even more difficult when going into a cemetery for the purpose of photographing it. It is always best to scout out the cemetery before attempting to photograph it to determine what time of day is best to photograph and plan to be there at the time of day that lighting is best. When this is not possible there are several tools which may be employed to enhance lighting of these stones when problems are encountered. First and foremost among these tools is a good mirror. Many of the larger home centers offer Mylar (plastic) mirrors of approximately 20" X 14" which may be readily framed and equipped with a set of legs to be used to prop and aim the mirror to provide additional light on the stone (see examples below this paragraph). Since most stones are flat with engraved (recessed) characters, lighting the stone from an oblique (shallow) angle will light the face and create shadows in the lettering, providing greater contrast to enhance legibility. If the stones are found under overhead trees, this large mirror may be aimed from a distance to provide additional lighting for photography.
In the event that additional lighting is not the key, there are other methods by which to improve the contrast between stone and lettering to obtain favorable results. Chalk is an excellent tool by which to improve this contrast. It can be employed either by filling in the characters of the engraving to make light letters on a darker background or by holding the side of the chalk flat against the stone and lightly chalking the face of the stone, taking care not to fill in the characters, to obtain suitable contrast for photography. The latter generally being the better choice for photography. This chalk has little long term impact on the condition of the stone; however visitors following you might find it objectional in appearance, so use it judiciously. Frequently the engraving on older, more porous, stones can be obscured by an overgrowth of moss or lichens to the point that engraving is not apparent at all. An excellent tool for the cemetery photographer's gadget bag are several plastic table knives. These plastic knives make excellent tools, disencrusters, to remove the overgrowth that obscures the all important engraved information. Plastic knives, unlike steel impliments, are not as detrimental to the stone's surface and may provide just the help that the stone requires to respond to photographic techniques. Again, use this method judiciously, since any abrading of the stone's surface on these older stones can be detrimental in the long term.
|
||||||||||||||||||||||||||||||||||||||||||||||||||||
|
"Show me the manner in which a nation cares for its dead, and I will measure with mathematical exactness the tender mercies of its people, their respect for the laws of the land and their loyalty to high ideals." - William Gladstone
|
|
©2003 Central Missouri Cemeteries |
©2003 Central Missouri Cemeteries - all rights reserved. This website and all information contained therein, is the intellectual property of the Central Missouri Cemeteries and is protected under all federal and international copyright laws. All information on this website may be used by individuals for their own personal use, libraries and genealogical societies; however, commercial use of this information is strictly prohibited without prior written permission. The images and maps contained on this website and derivatives thereof, may not be placed upon any website other than that of Central Missouri Cemeteries or included on any other publication without express written permission of the webmaster/owner. Copying of this website and the information contained hererein is forbidden without express written permission from the webmaster/owner. If copied by permission, this copyright notice must appear with the information.
Missouri Cemeteries formerly: Central Missouri Cemeteries (c)2003-2010 |
 - Cemetery Photography
 There is a range of digital cameras that cover a broad spectrum of resolutions from the low end cameras and early Sony Mavica, that stored its images on floppy disks, that produce images in the range 640 pixels X 480 pixels (0.31 megapixel resolution) up to the high end, single lens reflex 6.0+ megapixel cameras costing over $1000.00. The lower end cameras producing images in the 0.30 megapixel range are great for web work where the images will be used for general overview of stones rather than for the detail required to transcribe burial information from the digital images. On the other hand, the high end cameras, that are priced out of the price range of the average individuals, contain too much digital information and the resultant images use up too much valuable storage and limit the number of pictures that an individual can take in a cemetery without changing storage media. The happy medium within this broad spectrum of resolutions is a range from 1.4 megapixel to approximately 3.0 megapixel. The prices of these cameras will run in the $100.00 to $300.00 range and will produce satisfactory overview images of tombstones that contain sufficient detail that they are capable of being used for transcribing burial information. On the more difficult stones, there are a few tricks that can be used to enhance the contrast between stone surface and the engraved information to make it more legible. Sometimes the images are more suitable for stone transcriptions than viewing with the naked eye.
 Planning for sufficient storage of images is the next step in getting ready to photograph tombstones. When you go into a cemetery to photograph all of the stones you will want to be sure that you have sufficient storage to photograph all of the stones at a resolution which is high enough to be able to transcribe from, even with relatively illegible stones. The following table is offered as a guide to planning your storage needs. These values are nominal values which represent the norms on many cameras; however these values will vary from camera to camera and will also depend upon the compression settings (sharpness) that you select on your particular camera. Cameras which are lower in the resolution range will require less storage to accomplish your end result and can normally get by with 32MB storage or less while higher resolution cameras require more storage, frequently 128MB or more. Storage media has come down significantly in price within recent months with 64MB cards costing $25.00 to $35.00 and 128MB cards costing $40.00 to $60.00. The storage cards that come with cameras in this price range are normally 8MB or 16MB cards and are generally not sufficient to shoot anything other than the smaller cemeteries.
 Next you will need to make provisions for sufficient batteries to be able to complete your mission to photograph all of the stones in a given cemetery. Digital cameras are greater consumers of energy than your standard film battery powered cameras so be prepared to meet this increased power requirement. Battery number in a camera and battery life will vary from camera to camera and your needs must be determined based upon the particular camera that you have selected. Also if you make use of the LCD viewer on the back of your camera you will find that your battery consumption is signigicantly increased. If you will be doing much of this type of photography, we would recommend that you use a camera that has replaceable batteries as opposed to those which require special batteries and charger or docking station to charge the onboard batteries. Cameras that use this type of power/recharging arrangement are likely to leave you in the middle of a cemetery miles away from a location which you can charge the onboard batteries. Cameras using four (4) penlight, regular or rechargeable, batteries are most likely to allow you to replace one or several sets of batteries during your cemetery session without interruption. Two to three sets of rechargeable batteries will provide sufficient power to complete your mission and can be recharged following completion of the cemetery session in the comfort of your home. One or two extra sets of batteries can save an extra trip to a cemetery quite distant from your home.


